























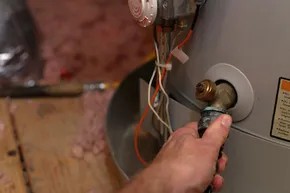
У водонагрівача одне завдання. Нагрівати воду. Забезпечувати ваш будинок гарячою водою. Це просто, доки не стає складно.
У міру нагрівання пристрою мінерали та осад осідають на дні. Це накопичення – головна причина, з якої вам потрібно знати, як злити бак водонагрівача. Якщо ви живете в районі з твердою водою, осад накопичується швидко. Він засмічує зливальний клапан. Він ушкоджує нагрівач. Злив та промивання пристрою хоча б раз на рік – це не просто рекомендація. Це потреба.
Сантехнік може це зробити за вас. Він візьме за це плату. Але для тих, хто любить робити все сам, злив бака водонагрівача це доступне завдання. Ми розглянемо, чому це важливо, які інструменти вам знадобляться і які кроки потрібно зробити, щоб зробити це самостійно.
Переваги зливу бака водонагрівача
Регулярне зливання води з бака водонагрівача продовжує термін його служби. Він запобігає корозії внутрішніх компонентів осадом та мінералами. Це основний механізм, який забезпечує довговічність бака.
Є й вторинна перевага. Ефективність.
Осад діє як ізолятор між нагрівальним елементом та водою. Пристрій доводиться працювати інтенсивніше, щоб досягти заданої температури. Це збільшує споживання енергії. Це роздмухує рахунки за комунальні послуги. Видалення шламу дозволяє нагрівачеві передавати тепло безпосередньо. Ви заощаджуєте гроші. Система працює холодніше та чистіше.
Також покращується якість води. Відкладення, що накопичилися, можуть надавати воді металевий присмак або запах. Промивання бака гарантує, що те, що виходить із вашого крана, є чистим, прозорим та безпечним. Цей процес захищає ваші інвестиції, одночасно підвищуючи комфорт у домі.
Чому технічне обслуговування зливу водонагрівача критично важливе
Періодичний злив додає роки до терміну служби пристрою. Осад на дні складається з мінеральних речовин та сміття. Якщо його не стежити, це викликає структурні проблеми.
Шар осаду ізолює стінки бака. Це знижує ефективність теплопередачі. Він також створює гарячі точки. Ці гарячі точки можуть спричинити корозію сталевого бака. Міцність конструкції знижується.
Заблоковані водопровідні лінії – ще один ризик. Осад може перешкоджати потоку води. Це призводить до зниження тиску води. Це може спричинити повне блокування. Періодично зливаючи воду з бака, ви запобігаєте цим поломкам. Ваш водонагрівач працює ефективно. Ваш будинок отримує стабільну кількість гарячої води.
Ризики незливання води з бака
Ігнорування технічного обслуговування спричиняє проблеми. Найочевидніша проблема – накопичення осаду. Цей шар може спричинити перегрів бака. Внутрішнє облицювання ушкоджується.
Стає необхідною передчасна заміна. Це дорого.
Безпека – реальна проблема. Перегрів може спричинити несправність. В останніх випадках це призводить до руйнування бака. Тиск може зростати доти, доки пристрій не лусне.
Осад також може стати розсадником бактерій. Це становить загрозу здоров’ю. Це спричиняє неприємні запахи. Якість води погіршується. Регулярний злив води є превентивним заходом. Він запобігає цим ризикам до їх виникнення.
Професійне обслуговування проти самостійної роботи
Чи зручно вам працювати із сантехнікою? Це вирішальний чинник.
Професіонали забезпечують безпеку та правильність виконання робіт. Вони мають експертизу. Вони мають спеціалізовані інструменти. Якщо ви не впевнені у своїх силах під час виконання сантехнічних робіт, найміть професіонала.
Якщо у вас є базове розуміння сантехніки, самостійна робота можлива. Це приємно. Ви краще познайомитеся із системами вашого будинку. Ви заощадите на виклику майстра. Це нескладний проект, якщо ви дотримуєтеся інструкцій.
Інструменти, необхідні для самостійного зливу
Вам не потрібна повна майстерня. Лише кілька необхідних речей.
Садовий шланг є обов’язковим. Він спрямовує воду з бака в слив чи надвір. Переконайтеся, що шланг щільно сидить на клапані.
Вам знадобиться інструмент для відкриття клапана. Плоска викрутка підходить для багатьох клапанів. Для деяких потрібний спеціальний ключ для клапана. Перевірте посібник до пристрою.
Засоби захисту – це не обговорюється. Рукавички захищають ваші руки. Захисні окуляри захищають ваші очі. Вода буде гарячою. Деталі можуть бути гострими. Не пропускайте цей крок.
Тримайте цебро поруч. Воно вловлює початкове проливання. Воно мінімізує безладдя. Воно робить процес гладкішим.
Ключ до успішного промивання – терпіння. Дайте воді стекти, доки вона не стане чистою. Не поспішайте із процесом.
Кроки по зливу бака водонагрівача
Спершу безпека. Вимкніть живлення. Для електричних пристроїв вимкніть автоматичний вимикач. Для газових пристроїв поверніть ручку у положення «Пілот». Це запобігає увімкненню нагрівача, поки бак порожній.
Вимкніть клапан подачі холодної води. Це зупинить надходження нової води в бак.
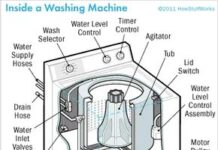
Підключіть садовий шланг до зливного клапана на дні бака. Направте інший кінець у підлоговий злив, господарську раковину або на вулицю. Переконайтеся, що шлях вільний від перешкод.
Відкрийте клапан. Використовуйте викрутку або ключ клапана. Вода почне текти. Вона буде гарячою. Будьте обережні.
Дайте воді стекти повністю. Це може тривати годину або більше. Вода спочатку буде чистою, а потім помутнішає, коли осад відшарується.
Як тільки бак спорожніє, закрийте клапан. Зніміть шланг.
Заповніть бак. Відкрийте подачу холодної води. Відкрийте кран гарячої води у вашому будинку. Це дозволить вийти повітрю. Коли вода потіче рівномірно з крана, закрийте його. Бак сповнений.
Для газових пристроїв запаліть пілотний пальник. Увімкніть автоматичний вимикач для електричних пристроїв.
Перевірте наявність витоків. Спостерігайте за пристроєм протягом перших кількох годин. Якщо все виглядає добре, то ви закінчили.
Це не просто технічне обслуговування. Це контроль. Системи вашого будинку не мають бути загадкою. Розуміння того, як вони працюють, заощаджує гроші. Це запобігає катастрофам. Можна змінити температуру води. Або зниження рахунку. Це невеликі перемоги. Вони складаються.
Але не зупиняйтесь на цьому. В історії є ще багато чого. Внутрішні компоненти мають свої особливості. Анодний стрижень потребує уваги. Клапан скидання тиску потребує перевірки. Ми розглянемо їх у наступному розділі.
Видалення осаду, що накопичився
Перепустка технічного обслуговування — це не стратегія, а лише відстрочка неминучого. Ви можете найняти професіонала або взяти шланг до рук та заощадити кілька сотень доларів. Якщо ви вирішуєте зробити це самостійно, почніть з вимкнення живлення. Електричний бойлер? Вимкніть автомат у щитку. Газовий? Опустіть температуру термостата до режиму пілот. Безпека насамперед. Не поспішайте у цьому питанні.
Далі перекрийте подачу води. Знайдіть вентиль на мідній трубі, що подає воду до верхньої частини бака. Щільно закрийте його. Потім знайдіть запобіжний клапан скидання тиску. Зазвичай він розташований у верхній частині. Відкрийте його обережно. Необхідно скинути тиск, що накопичився. Пара та гаряча вода можуть бризнути назовні. Саме тому необхідно використати захисні окуляри. Не нехтуйте рукавичками.
Коли тиск скинутий, переходьте до нижньої частини бака. Знайдіть зливний вентиль. Приєднайте до нього звичайний садовий шланг. Інший кінець направте в каналізаційний злив на підлозі чи вулицю. У жодному разі не зливайте воду у ванну, якщо не хочете отримати пляму, яка ніколи не випрається. Також відкрийте крани з гарячою водою у будинку. Це дозволить повітря проникнути всередину. Без повітря вода не зможе залишити бак. Такою є фізика.
Відкрийте зливний вентиль. Спостерігайте за водою. Вона буде схожа на іржаву воду. Темна, масляниста. Це осад. Вимиваються накопичені за десятиліття мінерали. Після того, як вийде кілька галонів води, вона має стати прозорою. Потім закрийте вентиль.
Ось трюк, який більшість людей упускає. Короткочасно увімкніть подачу холодної води, доки бак ще порожній. Це створює турбулентність. Вона зрушує з місця забруднення, що прилипли до дна. Дайте баку повністю наповнитися. Повітряні пробки – ворог. Ви бажаєте, щоб бак був заповнений на 100% перед тим, як знову увімкнути нагрівання. В іншому випадку ви спалите нагрівальні елементи за лічені хвилини.
Чому ваш бойлер витрачає гроші марно
Брудний бак – неефективний бак. Осад діє як ізолятор. Нагрівальні елементи нагріваються, але вода залишається холодною. Бойлер працює довше. Ваш рахунок за електроенергію чи газ зростає. Бак працює із підвищеним навантаженням. Він виходить з ладу завчасно.
Регулярне обслуговування усуває цю проблему. Йдеться не лише про чисту воду. Йдеться про ефективність. Йдеться про довговічність. Незалежно від того, газовий у вас бойлер або електричний принцип один. Видаліть забруднення. Відновіть теплопередачу.
Вам не потрібно бути сантехніком. Ви повинні бути послідовними. Зливаєте осад із бака щорічно. Це триває годину. Це заощаджує тисячі доларів за весь термін служби пристрою. Ігнорування проблеми коштує дорого. Очищення – дешеве.
Цей процес гарантує, що тиск води залишиться сильним, а вода буде гарячою. Більше ніяких очікувань, доки вода в душі нагріється. Більше ніяких холодних ванн. Лише стабільна робота.
Не дозволяйте осад перемогти. Він діє повільно. Він діє steadily. Він стає непомітним лише тоді, коли вже надто пізно. Зливаєте осад. Заощаджуйте енергію. Підтримуєте роботу системи.