That shirt has been in the drawer for eight years. It doesn’t match your pants. You’re wearing one black sock and one navy blue sock. You haul the hamper. You sort the colors. You stuff the drum until it groans. You add detergent. You hit start.
Silence.
The machine that has always been reliable is suddenly a paperweight. Washing machines are the unsung heroes of the home, arguably one of the most important inventions since the steam engine. When they quit, life gets messy. You don’t want to drag your dirty clothes to a laundromat and fight for a machine that might eat your quarters or ignore the gentle cycle.
You have two choices. Call a pro. Or figure it out yourself.
These appliances are complicated. They have timing cycles. Valves. Motors that spin the tub and drain water. But diagnosis isn’t impossible. You just need patience. And a basic understanding of how the guts work.
Before you touch a single screw, unplug the machine. Disconnect the power cord and the water hoses. Safety first. Always.
Newer models have electronic diagnostics. Check your owner’s manual. The error codes are often a roadmap. But even without a screen flashing a code, you can start simple.
Keep It Simple: Sometimes the Easiest Answer is the Right One
Before you tear into the back panel, look at the obvious. I know it sounds stupid. But people skip the basics every day.
Is it plugged in? Really plugged in? Sometimes the cord works itself loose behind the heavy machine. Give it a nudge. Check the outlet. Use a lamp to test it. If the lamp doesn’t light up, you’re not dealing with a broken washer. You’re dealing with a dead circuit.
Does it have water?
The machine needs two things to run. Power. And water. If the supply valves behind the washer are closed, the sensors will lock out the cycle. Check the hot and cold handles. Make sure they’re turned on. If you live in an older home, check the shutoff valves for corrosion. A stuck valve can look open but block flow.
Check the inlet screens.
These are small mesh filters inside the water inlet connections. They catch debris from your home’s pipes. Over time, they clog. A clogged screen restricts water flow. The machine thinks it’s not getting water. It stops. You need a pair of pliers. Shut off the water. Unscrew the hoses. Pull out the screens. Clean them with a toothbrush. Put them back. Hook up the hoses. Turn on the water. See if it starts.
If the water flows, the problem might be elsewhere. But if the screens were blocked, you just saved yourself a service call.
Don’t jump to complex repairs. Start with the power. Start with the water. Most “broken” washers are just unplugged or starved for hydration.


Check Power and Water First
Start with the basics. It sounds obvious, but a lot of “broken” washers are just unplugged or fed by empty walls. Before you tear into the casing, verify the outlet. Try a lamp. If the lamp dies, the issue is your home’s electrical grid, not the appliance. Check the breaker box. Look for a tripped switch. Flip it back. If the washer still won’t wake up, trace the power cord. Look for frays. Check the plug prongs.
But if the machine hums, lights up, or tries to spin without filling, you are past the electrical hurdle. Now, look at the water.
Twist the faucet handles. Make sure they are fully open. People turn these off to fix leaks and forget. Kinked hoses are another silent killer. Pull the washer out just enough to see the back. Look for sharp bends in the supply lines. Straighten them. If your model has a “water saver” or “eco” button, press it. Sometimes these features limit intake pressure, making it look like the machine isn’t filling when it actually is—just slowly.
Why Your Washer Needs Cleaning Too
If power is good. Water flows. And the cycle still fails or smells bad, the problem might be internal buildup. A dirty washer doesn’t just smell like mildew; it can clog filters, trap lint, and disrupt sensors.
You don’t need a specialist to flush it out. A simple maintenance routine keeps the machine from becoming a breeding ground for mold and detergent residue.
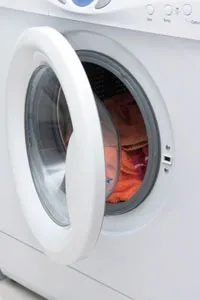
Stop. Put down the fresh towels. If your clothes are coming out of the washer smelling musty, sour, or just… off, you aren’t imagining it. And it’s probably not the detergent. It’s the machine itself.
You’ve been washing clothes in a petri dish.
The rubber door gasket on front-loaders? That’s a trap for moisture, lint, and soap scum. The dispenser drawer? A sludge factory. Even the tub walls hold onto residues that turn every load into a mildew bath. Here is how to clean a washing machine properly, without calling a technician yet.
The Quick Fix: Baking Soda and Vinegar
Start simple. Pull any visible lint from the tub—especially if you just washed towels or fleece. Lint blocks water circulation. It traps soap. It smells.
Fill the empty tub with hot water. Add half a cup of baking soda. Or three cups of white vinegar. Both cut through mineral deposits and neutralize odors. Run a complete wash cycle with no laundry inside. Let it do its thing.
If the smell lingers, the buildup is deeper.
The Heavy Duty Clean
For stubborn soap scum or mildew stains, you’ll need stronger stuff. Mix household ammonia with a mild detergent. Scrub the inside of the tub. Focus on the corners. The rubber seal. The dispenser.
Rinse it all out. Thoroughly. No residue left behind.
Then, wipe the tub down with liquid bleach. This kills the remaining bacteria and mold spores. But here’s the catch:
Rinse the tub thoroughly before using bleach. Never mix ammonia and bleach.
The combination creates chloramine gas. It’s toxic. It can irritate your skin, eyes, and lungs. Long-term exposure? Worse. Digestive issues. Kidney problems. Don’t risk it. Just rinse. Then bleach.
Run one final full cycle. Empty tub. Hot water. No clothes. This flushes out any remaining cleaning agents.
When the cycle ends, leave the door open. Let it air dry. Moisture is the enemy.
What If It Still Smells?
If the musty smell persists after this deep clean, the problem is hidden. Inside the drum. Behind the panel. In the drain pump.
You’ll need to take the washer apart.
A Look Under the Hood: Disassembling the Washer
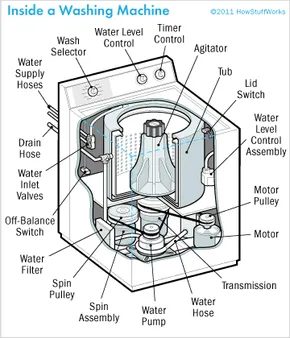
The guts of your machine live inside the washer cabinet. This is where you’ll find the electrical components that keep things running. Depending on who built your unit, this box is usually tucked behind the control panel at the top. It’s not always obvious how to get there. You need to know your specific model before you start pulling screws. Check the owner’s manual. It’s the only way to be sure you’re doing it right.
Safety first. Unplug the power cord. Disconnect the water hoses. Do not skip this. Tip a heavy machine over while it’s plugged in is a fast way to get hurt.
Here is how you break down the cabinet for basic access.
Removing the Control Panel
The control panel sits on top. You usually need to loosen or remove retaining screws to get it off. Sometimes these screws hide under a plastic strip or molding. Pull that trim away first.
Knobs are tricky. Some just pull off because they are friction-fit. Others are held by setscrews. These tiny screws have no head. You can’t grab them with fingers. Use a screwdriver or an Allen wrench to loosen them at the base of the knob. Then pull the knob straight off the shaft.
Accessing the Service Panel
You also need to remove retaining screws here. But do this after the machine is empty. Drain the water from the hoses and the tub. If there is water inside, tipping the machine creates a mess and a slip hazard.
Turn the washer onto its front or side. Most washers have an open bottom. There is no panel to remove there. This gives you the space you need to reach the internal service components.
Releasing the Top Cabinet
Getting the top off can feel like a fight. The panels are locked together with spring clips. Grab a stiff-bladed putty knife. Insert it into the seam where the top meets the side. Hit the back of the knife with your fist. Firmly. This shock releases the clips. Once they pop, the top lifts free.
Why This Matters
Washers are frustrating to fix because of the sheer number of control devices. We are talking about switches, timers, and relays. These parts tell the machine what to do. They are complex. They are small. They fail.
It feels overwhelming. It shouldn’t be. We are just getting started. The next step is figuring out which of these sophisticated parts has actually failed.
Which Switch to Fix?
Washing machines are complex beasts. Unlike a toaster that just toasts bread, a washer goes through elaborate cycles with dozens of settings. When things break, it’s rarely simple. But before you call a pro or buy a new unit, check the switches. These small components control the machine’s logic, and fixing them is often cheaper and faster than replacing the whole appliance.
The Lid Switch Safety Mechanism
The lid switch is your washer’s gatekeeper. It’s a safety device that tells the machine when the door is closed. If it fails, the washer won’t spin or fill. Dirt and detergent buildup are the usual suspects.
Here is how to clean and inspect it:
Step 1: Unplug the machine. Safety first. Grab a wooden manicure stick or a chopstick. Reach into the lid switch port inside the cabinet and clear out any gunk. Detergent residue can block the sensor, tricking the washer into thinking the lid is open.
Step 2: If cleaning doesn’t work, you need to get inside. Remove the top cabinet panel to expose the switch itself. Look for loose screws. If the switch moves when you close the lid or during a cycle, the screws have backed out. Tighten them. Also, check the electrical terminals. Loose connections here cause intermittent failures.
“A loose screw or clogged port can stop your entire laundry load.”
Temperature Selector Switch Issues
This switch handles two jobs: setting the water temperature and managing the fill cycle. It sits on the control panel.
If you suspect this switch is bad, do not try to fix it yourself. It requires special diagnostic equipment that most homeowners don’t have. Remove the switch and take it to a professional service center for testing.
Note this: if you have issues with both water temperature and tub filling, the timer might also be faulty. We will cover timer problems in the next section.
Water Level Control Switch Failures
Located right next to the temperature switch, the water level control switch keeps your tub from overflowing. It relies on a small air hose connected to the bottom of the washer tub.
The hose often comes loose. If it falls off, the switch can’t sense the water level, and your tub may overflow.
The Fix:
1. Cut about 1/2 inch off the end of the loose hose.
2. Use a push fit connector to reattach it. This simple metal fitting has tiny teeth that grip the tubing tightly.
3. Screw the switch back into place.
If the hose is secure but you still have overflow issues, the switch itself may be broken. Back out the screws holding the switch in place. Remove it and have it tested by a professional.
Timing Is Everything
If you’ve checked the lid switch, temperature control, and water level sensor, and your washer is still acting up, don’t give up. The problem might not be the switches. It might be the brain of the operation.
Keep reading. Next, we look at timer troubles.

When to Call It Quits
The mechanical timer is essentially the brain of your washer. It dictates water levels, fills the tub, drains it, and sets the rhythm for every cycle. Because it controls the core logic of the machine, any repairs to the timer should be made by a professional service person. You can do a few basic checks yourself if you suspect the unit is failing, but don’t go poking around with power on.
Step 1: Power Down and Inspect
First, unplug the washer. You need to get to the timer, which means removing the control knobs and the panel covering the controls. This is usually the same front panel we looked at earlier, but some models have a rear access panel instead.
Once you have access, look closely at the wires connecting the timer to the rest of the machine. Are any loose? Disconnected? If so, try seating them back into place. Most terminals accept wires like plugs. Use long-nosed pliers to push them in. Do not yank the wire by hand, or you will break the connection.
Step 2: Test with a Volt/Ohm Meter
If the wires are tight, you need a volt/ohm meter (VOM) to see if the timer is actually switching. Set the meter to the RX1 scale. This is the lowest resistance setting and is often the default.
- Disconnect the power leads from the timer.
- Clip one probe of the VOM to each lead.
- A working timer should read zero.
Since the timer is a multipurpose switch, you have to test it thoroughly. Turn the timer through its cycle. Test each pair of terminals in sequence. The meter must read zero at every point. If one or more readings show resistance above zero, the internal contacts are worn or broken. The timer is faulty. Replace it.
Step 3: Replacement
Unscrew the old timer. Disconnect it completely. You must install a new timer made specifically for your washing machine model. Generic parts often won’t align with the internal wiring harness.
Disconnect the old wires one at a time, connecting each corresponding new wire as you work. This ensures you don’t mix up the sequence. Once all wires are attached, double-check every connection for correctness. Screw the new timer assembly into place.
Rub-a-Dub-Dub: Servicing the Tub and Valves
Now we’re having some serious fun! Actually, you’re probably thinking about which is more painful, reading about laundry or actually doing it. Take heart — we’re approaching the spin cycle and you’ll be done soon.

Why Your Washer Won’t Fill or Fills Wrong
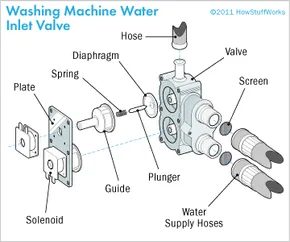
If your machine is flooding the laundry room or screaming like a jet engine, you need to look at the water inlet valves. These little components are usually the culprit when the tub won’t fill, fills too slowly, overfills, or spits out the wrong temperature. The good news? They’re cheap and easy to swap out.
Before you rip anything apart, check the basics. Make sure the faucets behind the machine are wide open. Check the connections. Are they screwed onto the correct hot and cold ports? Sometimes a cross-connection causes headaches that a valve replacement can’t fix.
Next, inspect the screens inside the valve inlets. Sediment builds up there. If they’re clogged, clean them or replace them. If water still isn’t moving, you can isolate the bad valve with a quick test using the temperature control.
Set the dial to HOT. If nothing comes out, the hot-water inlet valve is dead. If you get water, switch to WARM. If only cold water flows through the WARM setting, then the hot valve is definitely failing. Reverse this for the cold side. Set it to COLD. If you get warm water instead, the cold valve is stuck or broken.
If the tub overfills, unplug the washer immediately. If water keeps pouring in after power is cut, the valve is stuck open. Replace it.
How to Replace the Inlet Valve Assembly
Replacing these valves is straightforward if you follow the steps. You’ll need a screwdriver and maybe a pair of pliers for the hose clamps.
Step 1: Pull the washer away from the wall. Remove the back service panel. This usually involves unscrewing a few fasteners. Once the panel is off, disconnect the hot and cold water hoses from the valves. Have a bucket ready for residual water.
Step 2: Open the cabinet door. Locate the hoses that run from the valves into the tub. Disconnect them. You’ll also see wires attached to the terminals on the valves. Take a photo of the wiring configuration before you disconnect them so you don’t guess later. Unscrew the mounting hardware holding the valves to the machine. The inlet valves contain solenoids —coils of wire that create a magnetic field to open the valve.
Step 3: Before tossing the old valve, try tapping the solenoids gently with the handle of a screwdriver. Sometimes the plunger gets stuck. If the valve opens up after a tap, you might have saved yourself a trip to the hardware store. If not, replace the entire inlet valve assembly. Install the new one by reversing the removal steps. Reconnect wires, slide hoses back on, and secure everything.
When the Tub Gets Rough
Tearing clothes during the wash cycle is another common complaint. If your delicate shirts are coming out with rips, stop the machine and feel around the inside of the tub. Look for rough spots, burrs, or broken plastic tabs.
If you find a minor imperfection, you can often smooth it out with an emery board or very light sandpaper. Be gentle. You’re trying to remove the sharp edge, not carve out a chunk of the tub.
If sanding doesn’t work—if you have to grind down to bare metal or plastic to make it smooth—the damage is too extensive. The tub is compromised.
In this case, it’s probably much wiser to replace the entire washer.
Repairing a tub is rarely cost-effective. The labor involved in disassembling the cabinet, removing the old tub, and installing a new one often costs more than the tub itself. Plus, if the tub is bad, other components are likely on their way out too.
You’ve probably noticed by now that we’re moving into the really sticky problems. By this point, the weekend warriors have abandoned all hope and are strolling through the aisles
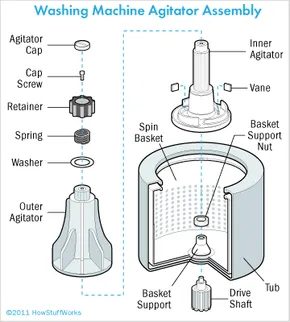

If your washer is throwing a fit during the spin cycle, the culprit is often the agitator. That finned tower in the middle of the tub can shred clothes if its edges are cracked or splintered. You might think you can just pinch the sharp bits with pliers or file them down. That works for a day. Maybe a week. It’s a band-aid, not a fix. The plastic is compromised. You need to replace the whole unit.
Getting it out isn’t always straightforward. Start by prying off the cap on top. Pull the agitator straight up. If it’s stuck, don’t yank harder. Tap the side gently with a hammer. Shock the bolt loose. If that fails, wedge something sturdy under the bottom rim to lever it out. Once the old one is gone, slide the new one in. Snap the cap back on. Done.
The Hidden Vibration Killer
If the agitator is fine but the machine is still shaking like it’s trying to escape the room, look for the snubber. It’s a pad, sometimes with a spring inside, usually hiding under that agitator cap you just pulled off. Lift the cap. Inspect the pad. If the spring is snapped or the rubber is worn thin, swap it out.
Snubbers don’t always live in the same spot. Some are tucked under the transmission. Others are part of the water pump housing. You just have to look until you find it.
What If There Is No Snubber?
Not every washer has one. If yours doesn’t, the noise is likely coming from the suspension unit between the tub and the cabinet. Listen closely. You’re looking for worn fins or pads. Sometimes you can replace just the pads. Often, the whole suspension unit is shot. Replace it or the noise stays.
Then there’s the basket support nut. It holds the entire tub assembly in place. It takes a beating every time you wash a load of towels. If it’s loose, tighten it. If it’s stripped or won’t budge, replace it. Don’t ignore it. A loose basket destroys bearings.
When the Tub Stops Dead
Sudden stops during the cycle freak people out. You assume the motor belt snapped. Maybe it did. More often, it’s just bad laundry habits. Check for wet clothes wadded up around the bottom of the tub shaft or trapped under the agitator. The machine stalls because the load is unbalanced.
Remove the basket or agitator to clear the jam. Pull out the clump of wet fabric. Reload evenly. If the belt is actually broken, that’s a different problem. We’ll cover that later. For now, fix the load.
Next, we’ll tackle water leaks.

Pinpointing a water leak in a washing machine is often a exercise in frustration. It might be a loose fitting, a split hose, a cracked housing, or a worn seal. Sometimes, however, the tub itself has developed a hole. If you suspect internal tub damage, the pragmatic move is usually to replace the entire unit rather than attempt a repair.
Most leaks, though, stem from simple connection failures. You can often stop the bleeding by tightening fittings. Here is the systematic approach to finding and fixing those leaks.
The Step-by-Step Leak Check
Start at the top and work your way down. Do not skip steps.
- Inspect the lid seal. If the gasket is torn or brittle, replace it. A compromised seal lets water escape during the wash cycle.
- Examine the hoses at the faucet. These are the visible lines connecting your machine to the home’s water supply. Tighten the connections. If the hose is bulging or cracked, replace it immediately.
- Check the hoses at the water valve connections. These connect the hoses to the valve assembly on the back of the washer. Tighten them. Replace if worn.
- Look at the drain hoses. Follow the hose from the machine to the standpipe or sink. Tighten clamp connections. Swap out the hose if it shows signs of wear.
- Verify the inlet nozzles. These feed water into the dispenser or drum. Tighten any loose fittings. Replace the nozzle if it is cracked.
- Tighten the splash guard. Located inside the drum, this plastic shield prevents water from splashing out. Ensure it is secure. Replace if broken.
- Check any plastic valves. Inspect the valve body for cracks. Tighten connections around them. If the plastic is fractured, replace the valve.
- Inspect the outlet hose to the drain. This is part of the drainage system. Tighten all clamps. Replace the hose if it leaks under pressure.
- Assess the water pump. This requires a deeper dive. See the next section for specific pump servicing instructions.
Once you have tightened or replaced components through step 8, you have likely addressed the most common sources of external water leaks. If the problem persists, the issue is likely internal.
Pump Problems: Servicing the Water Pump
If the leak remains after checking all external connections, the culprit is probably the water pump, the drive belts, or the motor itself. The following pages detail how to service these internal components.

Troubleshooting a Loud Washing Machine or Drain Failure
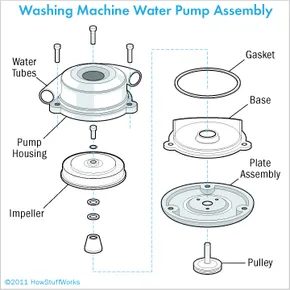
If your washer is making a loud rumbling noise or simply won’t drain, the water pump is often the culprit. It takes the most punishment in the machine, constantly cycling water in and out. Before you assume the pump is dead, though, check the simple stuff first.
Step 1: Start with the drain hoses. Disconnect the water supply hoses from the back of the washer. Use long-nosed pliers to pull out the filter screens from the valve ports or the hoses themselves. These tiny mesh screens catch lint and debris, which can clog them up. Wash them thoroughly. Put them back, reconnect the hoses, and run a test. If the rumbling persists or water still sits in the tub, move on to the pump.
Step 2: Access the pump. First, bail out and sponge up any remaining water from the tub. Tip the washer forward onto a heavy blanket or pad to protect the finish. Remove the back service panel. The pump sits at the bottom, but tipping the unit makes it much easier to reach it from the back rather than crawling underneath.
Step 3: Locate the pump. Two large hoses connect to it, held in place by spring or strap clips. If you have spring clips, use pliers to pinch the ends together and slide them down the hoses. Check if the hoses are kinked or crimped at these connections. Straighten them out and reattach. Test the machine again. If it still won’t drain, the pump itself needs removal.
Step 4: Remove the pump. Loosen the bolt that keeps the drive belt taut. Slide the motor on its bracket to slacken the belt, then move the motor aside. Unbolt the pump from its housing. Support the pump with your hand as you remove the final bolt to keep it from dropping. Lift it out.
Step 5: Inspect and clean. You might be able to take the pump apart. Often, the issue is just lint, dirt, or a stray sock trapped inside. Clear out all debris from the pump and the water tubes. Reassemble and hook it back up. Test it. If cleaning doesn’t fix the rumbling or drainage issue, or if the housing won’t come apart, you’ll need to replace the pump with an identical model.
Step 6: Install the new pump. Place it in position and secure it with the mounting bolts. Move the motor back into place. Tighten the drive belt by prying it taut with a hammer handle or pry bar. The belt should flex about 1/2 inch when you press on the center point between the two pulleys.
Step 7: Reconnect the hoses leading to the pump.
If the pump isn’t the problem, your belts and pulleys might be wearing out. That’s a different beast entirely.
Belts and Pulleys and Motors, Oh My!
Tensioning the Belt for Proper Wash Performance
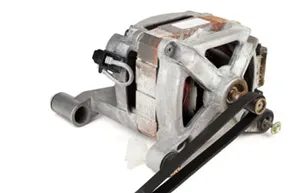
The motor bracket is just a metal brace holding the motor housing. You need to loosen the bolt on it first. This gives you slack. Once there’s wiggle room, slide the old belt off. Stretch the new one onto the pulleys.
Now comes the tricky part. You can’t just bolt the motor back down. You need tension. Grab a hammer handle or a short pry bar. Push the motor into position against the belt’s resistance. Tighten the bracket bolt while holding it there.
How much tension? About 1/2 inch of deflection. Press the belt at the center point between the pulleys. It should give a little. Not much. If it’s loose, the belt slips. The machine malfunctions. If it’s too tight, the belt wears out fast. It gets hot. You might even smell smoke. Neither extreme is good.
Don’t Neglect the Pulleys
Loose pulleys cause identical symptoms to a bad belt. Check them before you blame the motor. Most pulleys sit on shafts with setscrews around the hub. Look closely. Setscrews have no heads. They’re easy to miss. But they must be tight. If they’re loose, the pulley or belt slips.
The resulting failure can look like a faulty motor. It’s not. Tighten the screws. Adjust the belt. Save yourself a service call.
When to Call a Pro
Most motor issues require a professional. Do not try to fix the motor yourself unless you know what you’re doing. There is one exception. If you have a universal motor, you can replace worn carbon brushes if sparking occurs. This is detailed in How to Repair Appliances.
If the motor is shot, take it out. Remove the back panel. The motor mounts on that adjustable bracket. Take the motor to a professional. Let them repair or replace it. Then reinstall it yourself. It saves money. It’s safer than guessing.
Washing machines are complicated. Lots of moving parts. Yet they last around 12 years. That’s decent. Use these tips. Squeeze out a few more years. Get clean laundry.
Frequently Asked Questions
How often should I clean my washing machine to prevent malfunctions?
Regular cleaning is recommended at least once a month to prevent buildup that could lead to malfunctions.
What’s the first step if my washing machine stops spinning?
Check the power source and ensure the machine is plugged in and the circuit breaker hasn’t tripped.