Your electric can opener is supposed to be the MVP of your pantry. It handles the heavy lifting, saving you from battling stubborn lids with a manual tool. But when that sleek machine stops spinning, you’re left staring at a can and considering takeout. Don’t panic. These appliances are mechanically straightforward. Most failures stem from simple neglect or a single faulty component. Before you toss it, try fixing it.
The Mechanics Behind the Magic
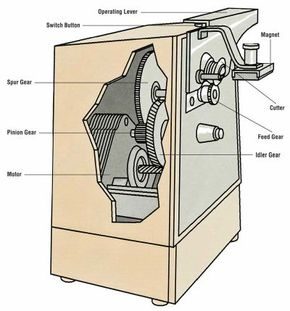
Understanding how the machine works helps you diagnose what’s wrong. You lift the operating lever to clamp the can. A magnet holds the lid in place while the feed gear grips the rim. Pressing the lever down completes the circuit. The motor engages, driving gears that rotate the can against the cutter wheel. The blade slices through the metal. When you lift the lever, the can comes free. The lid stays stuck to the magnet, ready for disposal.
If it’s not doing this, something in the chain is broken.
Prevention: Clean and Lubricate
Most issues are preventable. Food residue, grease, and metal shavings accumulate around the cutter and feed gear. This buildup creates friction. It strains the motor. It dulls the blade.
Make cleaning part of your routine. Unplug the unit first. Never skip this step. Use a toothbrush and mild detergent to scrub the cutter wheel and the gear that grips the can. Rinse well. Dry thoroughly.
Apply a drop of light machine oil or white lithium grease to the moving parts. Wipe away the excess. You don’t want oil dripping onto your food or attracting more dirt. Regular maintenance keeps the gears turning smoothly and extends the life of the motor.
Repairing the Switch
The switch is the brain of the operation. It detects when the lever is down. If it fails, the motor never starts.
If your opener won’t turn on, the switch is the first suspect.
Step 1: Remove the outer casing. This exposes the internal mechanism. You need to see how the lever interacts with the switch contacts.
Step 2: Press the lever manually. Does it hit the switch? Sometimes, a piece of debris or a misaligned plastic tab blocks the contact. Clear the obstruction. Adjust the lever so it seats properly against the switch.
Step 3: If the lever is fine but the unit still won’t power on, unplug it. Use a multimeter set to test for continuity. Touch the probes to the switch terminals. When the lever is pressed, the multimeter should beep or show a reading. If it’s dead, the switch is faulty.
Step 4: Corrosion can mimic a broken switch. Clean the contacts with emery paper wrapped around pliers. Spark it back to life.
Step 5: If cleaning doesn’t help, the switch needs replacing. Note the wire positions before disconnecting them. Remove the mounting screws. Install the exact replacement part. Match the model number if possible.
Checking the Gears
Gears transfer power from the motor to the can. If they strip or break, the can won’t rotate.
Inspect the feed gear first. This is the small toothed wheel that grips the can’s rim. If the teeth are worn down or broken, the gear slips. Replace it.
Inside the housing, larger gears drive the assembly. Remove the cover to inspect them. Look for missing teeth. Check for warping. Clean away packed-on grime.
Lubricate the gear teeth with white lubricant if they feel dry or gritty.
If a gear is cracked, you might be able to glue it back together using a strong plastic or metal adhesive. Let it cure fully before reassembling. Test the unit. If it still grinds, the gear is beyond repair. Buy an exact match. Width, circumference, and tooth count must align perfectly.
The Built-in Knife Sharpener
Some openers have a grindstone for sharpening kitchen knives. This feature often causes its own problems.
Shavings from the stone clog the mechanism. Debris jams the motor. This can burn out the motor or blow a fuse.
Clean the grindstone area regularly. Remove any accumulated dust.
If the stone is worn down, it needs replacement. Some models use a screw or clip. Others require replacing the entire shaft assembly. If the sharpener is more trouble than it’s worth, you can sometimes disconnect it entirely. Check your model’s manual to see if bypassing it is an option.
Diagnosing the Motor
The motor is the heart. Most electric can openers use a shaded-pole motor. It’s cheap and reliable, but it can fail.
To test the motor, you need a multimeter.
Step 1: Unplug the opener. Open the housing. Locate the motor. Find the fuse on the motor winding.
Step 2: Test the fuse for continuity. Place one probe on each side of the fuse. If there’s no continuity, the fuse is blown. Replace it.
Step 3: If the fuse is good, test the field coil winding. Place the probes on the two wires leading to the coil. If the multimeter shows an open circuit (infinite resistance), the winding is broken. You’ll need to replace the entire motor unit.
Step 4: Inspect the bearings. Spin the shaft by hand. It should turn smoothly. If it wobbles or grinds, the bearings are shot. Remove the rotor to check for damage. Excessive wear here can kill the motor.
Buy a replacement motor with the same size and rating. Match the shaft diameter and mounting holes.
Is It Worth the Effort?
Electric can openers are inexpensive. Sometimes, buying a new one is cheaper than sourcing a specific gear or motor. But if you enjoy tinkering, the repair process is educational. You learn how simple appliances work. You save money. You reduce waste.
Start with the switch. It’s the most common failure point. If that doesn’t solve it, move to the gears. Then check the motor.
What’s the last thing you fixed that you thought was trash? Sometimes the solution is just a drop of oil and some patience.


