Your electric bill is bleeding money you don’t have. It’s not a mystery. From 1950 to 2000, the average US home size more than doubled. We filled that extra space with bigger, louder, heavier machines. Double ovens. Six-burner cooktops. Refrigerators big enough to park a car next to. Large-capacity washers and dryers that felt like statements of prosperity.
They were impressive. They were also energy vampires.
If you are downsizing your lifestyle, your square footage, or your budget, you don’t need industrial-scale gear. You need tools that fit the job for one or two people. You need efficiency. You need compactness.
Here is where we start.
Stacked and Stackable Washer-Dryer Combinations
Laundry is the biggest space hog in any utility closet. Traditional setups eat up floor space. They require wide aisles. They make small bathrooms feel like tunnels.
A stacked washer-dryer solves three problems at once.
First, it saves floor space. Instead of two units side-by-side, you get one vertical column. This is essential if your laundry area is a narrow hallway or a tiny bathroom corner.
Second, it saves money on installation. One water hookup. One drain. One electrical connection (if electric). One vent (if gas dryer, though most stackable units are electric heat pump dryers now).
Third, it lowers energy consumption. Compact machines use less water and electricity per load than full-sized models.
Tools and Materials Needed for DIY Installation:
– Adjustable wrench
– Pipe wrench
– Screwdriver set (Phillips and flathead)
– 3/4″ or 5/8″ washing machine hoses (check your model spec)
– Dryer vent hose (flexible aluminum or semi-rigid)
– Level
– Stud finder (if mounting to wall)
Safety Check:
– Verify your water shut-off valve is accessible.
– Ensure your circuit breaker is 15 or 20 amps, as required by the manufacturer.
– Do not run the dryer without a proper vent. Lint buildup is a fire hazard. Heat pump dryers recycle air but still need a condensate drain.
How to Install a Stackable Unit:
1. Clear the space. Measure height, width, and depth. Stackable units are typically around 77 inches tall. Make sure you have clearance above for ventilation.
2. Check the floor. The floor must be level. Use a level to check. Adjust the feet if necessary.
3. Connect water lines. Turn off the main water supply. Connect the hot and cold lines to the washer. Use new hoses. Check for leaks after turning the water back on.
4. Connect power. Plug the unit into a dedicated outlet. Do not use an extension cord.
5. Vent the dryer. If it’s a vented dryer, connect the exhaust hose to an exterior vent. Use a short run and avoid kinks. If it’s a heat pump model, connect the condensate drain to a floor drain or pump.
6. Secure the unit. Some models come with wall anchors. If not, and the unit is wobbly
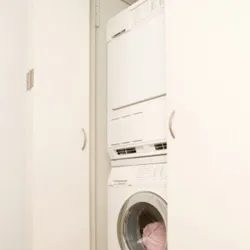

7: Stacked Washer and Dryer Combinations
Lugging laundry to a Laundromat is a chore. It is heavy, it is wet, and it ruins your afternoon. Keeping the machines in your home solves that problem. But there is a cost. Standard front-loaders are massive boxes of steel. They eat up floor space. They can dominate an entire wall in a small apartment or laundry closet.
Space is limited. Vertical space is usually wasted. You can stack your dryer directly on top of your washer. This configuration lets you utilize the empty air above the washing machine. It frees up the floor area where the dryer used to sit. Suddenly, you have room for a shelving unit, a folding table, or even a small storage cabinet. It is effectively a new closet.
These units come in various sizes. You can find compact models for apartments or full-sized, Energy Star qualified front-loaders. The larger units use less water and electricity than older top-loading models. They are efficient. They are quiet.
You will likely buy them as separate units. You will also need a stacking kit. This is a metal frame or bracket system. It locks the two appliances together. Without it, the dryer could shift during the spin cycle. That is bad for the machines and worse for your floor.
Stacking your dryer on top of the washer is the simplest way to gain back vertical square footage in a tight utility room.
Consider the workflow. You load the washer. You start the cycle. While it runs, you can fold the clothes from the previous load. The dryer is right above you. You just lift the laundry up. No lugging. No bending. It changes the physical dynamic of the chore.
6: Single Drawer Dishwashers
The kitchen has a new trend. It is a dishwasher that looks like a drawer. It is about 16 inches (41 centimeters) high. It pulls out from your cabinet just like a deep storage drawer.
Traditional dishwashers take time to fill. You might wait a week to get a full load. That is inefficient. A single drawer dishwasher is half the size. You fill it twice as fast. You run cycles more frequently. It keeps your kitchen clean without the delay.
The price is the catch. You do not save half the money. In fact, you pay more. Currently, these single drawer units cost more than twice what a mid-range standard dishwasher costs. They are a premium product. They are for people who value speed and space over budget.
Did You Know?
In 2006, the average household size dropped to a historic low of 2.6 people.
5: Small Refrigerators
Standard refrigerators are built for families. They are tall and wide. They take up a significant portion of a small kitchen. If you live alone or in a studio, a full-size fridge is often overkill. You are paying for space you do not use.
Small refrigerators, often called mini-fridges or compact fridges, are a practical alternative. They are shorter. They are narrower. They fit under a counter or in a corner. They use less electricity. They are cheaper.
These units are not just for dorm rooms. They are for anyone with limited kitchen space. You can keep your milk, eggs, and leftovers in a compact unit


You’ve seen the counter models. They work for pasta nights. But when you need to cook a whole bird or roast vegetables, that tiny box becomes a bottleneck. You’re left juggling dishes, waiting for the oven to preheat, and wondering why your kitchen feels like a storage unit. That’s where a full-size microwave oven steps in. It’s not just for popcorn. A 1.5-cubic-foot model gives you room to actually cook. You can heat leftovers without the cold spot in the middle. You can bake a pizza. You can defrost a chicken in under ten minutes. The difference isn’t just size. It’s control.
Inverter technology changes the game here. Standard microwaves blast high heat, then low, then high again. It’s a seesaw. Your food cooks unevenly. Inverter models adjust the power level continuously. You set it to 30%, and it stays there. Gentle, steady heat. That means no more rubbery edges on a steak. No more soggy bottoms on reheated soup. Brands like Panasonic and LG put this in their mid-range units. It’s not a luxury feature. It’s a functional one. If you’re upgrading, look for it.
Which microwave features actually save time?
Convection modes are the other big jump. A standard microwave uses radio waves. A convection microwave adds a heating element and a fan. It cooks like a conventional oven. You can roast. You can brown. You can bake cakes. The trade-off? Price. Convection models cost more. They take up more space. But if your oven is broken, or if you live in an apartment with limited oven access, it’s a legitimate backup. You’re not just reheating. You’re cooking.
Where to install the unit without ruining your workflow
Over-the-range (OTR) microwaves are the default for small kitchens. They sit above the stove. They vent outside. They save counter space. But they’re heavy. They need support. The mounting hardware isn’t always included. You might need a wall bracket. You might need to reinforce the stud behind the cabinet. If your kitchen has a range hood, you can replace it. If not, you’re adding bulk to an already tight space.
Built-in microwaves are different. They go into a cabinet. They look clean. They flush with the cabinetry. But they require specific clearances. You need a cutout. You need ventilation ducts. You need a dedicated circuit, often 120-volt, sometimes 240-volt depending on the model. If you’re doing a renovation, this is the time to plan it. Wiring it in after the fact means opening walls, pulling permits, and dealing with code inspections. It’s doable. It’s not casual.
How to avoid common installation mistakes
Don’t ignore the ventilation path. A microwave that vents into the room just moves the smell around. You want it going outside. That means a duct. That means a hole in your wall or ceiling. That means a cap on the roof. Skip that, and you’re trapping grease and humidity in your kitchen. Your cabinets will smell. Your walls will mildew.
Check the electrical requirements before you buy. Some high-wattage units, especially convection models, need a 20-amp circuit. If your kitchen

Portable induction cooktops vs. fixed range: The energy math
Most people assume swapping out a gas stove for a standard electric one is the peak of kitchen efficiency. It is not. A portable induction hotplate changes the physics of how you heat food entirely. Instead of warming the air around a coil and then warming the pot, induction transfers energy directly through a magnetic field into the cookware. That jump cuts waste.
The numbers are stark. You will likely see a 30-40% reduction in energy usage compared to a standard electric element. In a small apartment or a summer kitchen where you do not want to bake the whole house, a single-burner induction unit beats a double-oven range every time. It takes up half a shelf. It fits in a backpack. And it cooks faster because the pan itself becomes the heating element.
Which cookware works with induction?
Not every pot will do. You need magnetic stainless steel or cast iron. Test it. If a refrigerator magnet sticks firmly to the bottom of your pot, it works. If it falls off, you need to buy new pans or use an induction adapter plate. Aluminum and copper pans will not work directly on the surface.
How to choose the right wattage
Do not just buy the cheapest unit. You want at least 1800 watts for real cooking. Lower wattages exist, but they turn a simple boiling of water into a 15-minute wait. For simmering sauces or heating rice, 1000-1500 watts is sufficient. For searing meat or boiling pasta quickly, aim for 2000+ watts. The hotter the surface, the less time the element runs, which means less energy pulled from the grid.
Is a portable induction cooktop safe for unattended cooking?
Yes, but not if you ignore the safety features. Modern units have auto-shutoff if the pot is removed or if the surface gets too hot without a load. They also shut down if a spill occurs. However, the surface stays hot long after you turn it off. The glass-ceramic top does not show heat the way a glowing coil does. Treat it like a cast iron skillet. Let it cool before you clean it, or use a silicone spatula and a damp cloth once it is warm enough to touch.
Wear dry gloves. Water on the glass can cause a thermal shock crack in extreme cases, though rare. Keep the vents clear. If you store it, keep it flat and away from heat sources. Do not use it on a wooden table without a silicone mat or trivet underneath. The heat transfer is direct and intense.
Where to use a portable induction hotplate beyond the kitchen counter
Think outside the kitchen. A camping setup with a 1500-watt inverter can power this unit, making it a serious outdoor cooking tool. It has no open flame, so it is safer than a propane burner in a tent or RV.
It also works as a temporary replacement if your main stove breaks. You can cook a full meal on a single induction burner, just slower. The control is precise. You can drop from a boil to a simmer instantly. No lag. No overshooting. That precision saves energy because you are not constantly correcting a stove that is too hot or too cold.
Buy a unit with a digital display
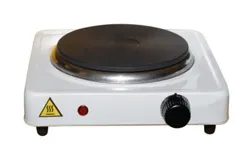
Why a Portable Induction Cooktop Might Be the Easiest Upgrade
Hot surfaces cause burns. That is the entire problem. An induction cooktop solves it by making the actual unit stay cool to the touch. Only the pot gets hot. The heat generates inside the pot itself, not on the surface beneath it. This means you can send a portable one- or two-burner model to college with your kid without worrying about a hot stove element in a dorm room.
The cooking unit stays cool to the touch.
The technology relies on magnetic fields. The heating element is a solid disc, not exposed, glowing coils. No glass shattering. No coil burns. Just instant heat that transfers completely to the cooking vessel.
But there is a hard limit. If a magnet sticks to the bottom of your pot, you are good to go. If it does not, the cooktop will not work. Stainless steel pots often fail this test. Cast iron and carbon steel pass. Before you buy a portable induction unit for a small kitchen or a dorm, test every pot you own with a fridge magnet.
You need the right cookware. That is the only real catch. If your kitchen is full of aluminum or glass-bottomed pans, you are buying new pots. If you already cook with cast iron, you are set. The portability is a huge plus for renters or anyone who needs to move a heat source around. A two-burner model fits on a countertop without taking up square footage.
How to Check if Your Cookware Is Induction Compatible
Grab a magnet. Stick it to the bottom of your pot.
- Sticks firmly: Induction ready.
- Does not stick: Not induction ready.
This applies to the bottom surface specifically. A pot with a stainless steel side and a steel base is fine. A pot with an aluminum core and no magnetic base is out. You cannot use a magnetic plate adapter effectively for long-term cooking on induction because it adds heat transfer lag and stability issues. Buy the right pot.
The surface stays cool. That is the safety win. You can touch the cooktop while it is running. You can clean it while the pot is still on it, as long as you are careful not to spill liquid onto the electronics. The solid disc design means there are no crevices for food to get stuck in, unlike coil elements.
For a small kitchen, this changes the workflow. You do not need to heat up a range. You do not need to ventilate a large oven. You just place the pot, turn on the unit, and cook. The response time is immediate. Turn it off, and the heat stops. No residual heat left on the surface.
Is it worth it? If you have the cookware, yes. If you do not, factor in the cost of replacing your pots. For a dorm, a single burner is enough. For a small apartment, two burners give you flexibility. The unit itself is light. You can lift it off the counter, wipe it down, and move it to the floor if you are making a big batch of chili.
The material of the pot matters more than the brand of the cooktop. Magnetic properties are physics, not marketing. Test the bottom. That is all you need to do.

4: Miniature Personal Coffeemaker
Imagine landing a book contract. Your friend did exactly that at a conference. She had a brand-new manuscript in hand. She printed it on a compact printer she carried in her bag. No hotel printing. No waiting. Just results.
That convenience is rare. Most people rely on hotel printing or office setups. Compact printers start around $30. They fold down to about the size of a shoe box. When not in use, they disappear into a drawer or closet. Most are Energy Star qualified. If you don’t need a copier, scanner, and fax combo, this is a space and energy saving option for your home office.
“When business takes you on the road, wouldn’t it be comforting not to have to rely on hotel printing?”
The coffee maker follows the same logic. Small footprint. Low cost. High utility. You don’t need a large appliance for one cup. You need a fast, reliable way to get caffeine without the mess.
- Size: Fits on a small desk or nightstand
- Price: Often under $50
- Setup: Plug in and go. No complex assembly
- Cleanup: Usually dishwasher-safe parts
Why does this matter for a renovation or DIY project? Focus. If you are spending weekends on a project, you need minimal distractions. A large kitchen setup takes time to clean. A personal maker takes seconds. It keeps your workspace clean. It saves counter space. It avoids the need to move things around.
Think about where you will put it. Kitchen counter? Bathroom vanity? Garage workbench? The location should match your routine. If you brew coffee before you start work, put it near your entry point. If you brew during a break, put it near your chair.
Materials matter. BPA-free plastic is a good standard. Stainless steel housing lasts longer. Check the wattage. Lower wattage means less energy use. That fits the same energy-saving mindset as the compact printer.
Do you really need a fancy machine? Probably not. A simple drip model does the job. Single-serve pods offer convenience but cost more over time. Ground coffee is cheaper. It requires more effort, but it is more flexible.
Safety is straightforward. Keep the cord away from water. Don’t run it unattended. Let it cool before cleaning. These are basic rules, but they prevent accidents.
The goal is simple. Reduce friction. Get what you need quickly. Move on to the next task. That mindset applies to tools, printing, and coffee alike.

3: Compact Wine Cooler
Let’s talk wine. Not the 1982 Bordeaux you’re hiding in a closet, but the everyday pinot noir or riesling you actually drink. A compact wine cooler changes how you store and serve. It is not a fridge. It does not have a freezer. It is a temperature-controlled box.
Why does that matter? Because wine is alive. It breathes. Temperature swings kill flavor. A regular fridge is too cold. It dries out the cork and accelerates aging. A wine cellar is too humid and expensive. A small, dedicated unit sits at the sweet spot.
You need to know the specs before you buy. Look for dual-zone models if you drink both reds and whites. Reds prefer 55 to 65 degrees Fahrenheit. Whites want 45 to 55. A single-zone unit forces a compromise. You pick one temp and live with it. Most compact units range from 8 to 24 bottles. That is a weekend’s worth of stock.
Installation is simple but requires planning. You need a level surface. Vibration from a fridge compressor next door will rattle your bottles. Keep it away from direct sunlight. UV rays cook wine. The unit draws power like a small TV. Check your circuit load. You do not want a tripped breaker on a Friday night.
Cleaning is minimal. The interior is usually glass and metal. Wipe the shelves with a damp cloth. Check the door seal for cracks. A bad seal lets warm air in, spiking the temp and stressing the compressor. Listen for it. A loud hum or rattle means something is off.
Is it worth the cost? Compared to a standard fridge, yes. Compared to a full-size cellar, absolutely. You get consistent temperature without the real estate. You get a dedicated space for your favorite pours. You stop guessing what temperature that bottle is sitting at.
Wine is not just a drink. It is a variable. Control the variable, control the taste.
Do not treat it like a novelty. Treat it like a tool. Your tool for serving better wine, night after night.

Portable Air Conditioners for Small Spaces
Downsizing often means losing the square footage for bulky appliances. That includes dedicated wine storage. You don’t need a cellar. You need a box. An 8-bottle counter top unit costs roughly $80. It sits on the kitchen counter. Done.
Need more capacity? Look for 10 to 12 inches of floor space. Check for a nearby electrical outlet. A freestanding upright model holds 12 to 18 bottles. These units feature glass doors. Interior lighting makes it easy to spot that rare Bordeaux without opening the door.
Why does this matter for longevity? These coolers run quiet. No vibration. No Freon cycling through aggressive compressor fans. The wine ages in stillness. The energy efficiency helps your utility bill. The footprint saves your floor plan.
“Sit back, relax, and give a toast to good wine and a little more extra space.”
Your cellar is gone. Your collection isn’t.

Portable AC units: Why they beat window mounts for whole-home comfort
You’re in the kitchen. You’re not in the living room. Why spend energy chilling a space where nobody is sitting? That’s the logic behind portable air conditioners. They solve the “one room at a time” problem by letting you move the cold air source with you.
Forget the bulky, ugly boxes bolted to your window frames. Modern units look like high-end tech appliances. They roll. They have handles. You push them from the master bedroom to the home office, then to the kitchen, without dragging heavy machinery or modifying your architecture.
Key features to look for in a portable AC:
– Eco-friendly coolant : Less environmental impact than older R-22 systems.
– Automatic condensation drainage : No buckets to empty. The unit handles its own moisture.
– Triple-function operation : Runs as an air conditioner, a fan, or a dehumidifier. This matters in humid climates where you need moisture control more than just temperature drops.
A compact unit pushing 8,000 BTUs is a sweet spot for most homes. It’s strong enough to keep a kitchen bearable while you cook dinner, then strong enough to cool a master bedroom through the night. It’s not cooling the entire house, but it’s cooling the room you’re actually using.
Mini Vacuum Cleaner

Why a rechargeable stick vacuum beats the corded beast
Corded vacuums are heavy. Bulky. They drag around the house like a dead fish. A lightweight, rechargeable stick vacuum changes the game. You unplug and go. No extension cords. No tripping hazards. Just immediate cleanup.
Ball-and-joint construction is the magic here. The wand bends. It glides into narrow spaces where a rigid pole would jam. Foldaway handles let you lift the suction mechanism up. Stairs. Blinds. The top of the refrigerator. You reach spots the big canister vacuum simply cannot touch.
Some models do double duty. The main unit pops out into a handheld vacuum. One tool, two modes. Perfect for car seats, couch crevices, or quick kitchen spills.
How to pick the right lightweight model
Check the battery life. If it dies mid-cleanup, you’re back to dragging out the big machine. Look for swappable batteries or fast-charge capabilities.
Weight matters. If you have to lift it up stairs daily, keep it under 8-10 pounds. The foldaway handle helps, but a heavy unit still strains your back.
Suction power is not one-size-fits-all. For hard floors, a lighter unit works. For carpet, you need more torque. Test it on your actual flooring if possible.
Safety and maintenance for small vacuums
Clear the filter before every use. A clogged filter kills suction and burns the motor. Most models have a visible dust bin. Empty it before it overflows.
Store the battery properly. Keep it charged at least 50% if you don’t use it weekly. Deep discharge damages lithium-ion cells.
Wipe down the ball joint. Dust accumulates in the pivot points. A dry cloth keeps it moving smoothly.
Don’t ignore the cord. Even though it’s cordless for use, the charging cable matters. Inspect it for fraying. A damaged charger is a fire risk.
Where these vacuums actually shine
Small apartments. No space for a big canister in a closet. Stick vacuums lean against walls.
Multi-level homes. Carrying a 20-pound vacuum up stairs is a workout. A 6-pound stick vacuum is manageable.
Pet owners. Hair clumps on hardwood floors. A handheld attachment grabs what the main brush misses.
Emergency spills. Coffee. Red wine. Pet accidents. You need suction now, not after finding an outlet.
The big vacuum still has its place. Deep cleaning. Large carpeted areas. But for daily maintenance and spot cleaning, the lightweight stick vacuum wins. It’s not a replacement. It’s a partner. Use both. Keep the big one for monthly deep cleans. Use the stick for everything else.