Store-bought furniture is a gamble. You spend hundreds, sometimes thousands, and you are guessing about the wood quality. The color might look different in your lighting. The style might feel off within a month. It is frustrating.
Building your own wooden furniture solves this. It costs less. You control every variable. You pick the lumber. You choose the stain or paint. You get exactly what you envisioned, not what a warehouse has in stock.
This guide starts with the basics. A simple, freestanding bookcase. It requires minimal tools. The instructions are straightforward. If you can follow steps, you can build this.
Why Build Your Own Bookcase?
Many homeowners hesitate to DIY because they fear complexity. A bookcase is the perfect entry point. It is structural but not intricate. There are no complex joinery techniques required for a basic version.
The savings are real. Retail markup on wood products is steep. Raw lumber is cheap. You pay for labor when you buy finished pieces. You pay for your own time when you build. The difference adds up quickly.
Beyond cost, there is customization. Standard bookcases come in fixed depths and heights. Your space is likely unique. You can adjust the dimensions to fit awkward corners or specific storage needs.
Tools and Materials You Need
You do not need a professional workshop. A garage or basement is fine. Here is what you will gather before starting.
- Measuring Tape : Essential for accuracy.
- Circular Saw or Table Saw : For cutting wood to length.
- Drill/Driver : For assembling pieces.
- Pocket Hole Jig : This simplifies joinery. It allows you to hide screws and creates strong connections without advanced woodworking skills.
- Sandpaper : 120-grit and 220-grit for smoothing surfaces.
- Wood Glue : Strengthens joints.
- Screws : Wood screws compatible with your jig.
- Lumber : Standard pine or oak boards. Check for warping before buying.
Safety first. Wear eye protection. Use ear protection if the saw is loud. Keep fingers away from blade paths.
Step 1: Plan Your Dimensions
Measure your intended space. Note the width, height, and depth. A standard bookcase might be 30 inches wide, 60 inches tall, and 10 inches deep. Adjust these numbers to fit your wall.
Decide on the number of shelves. More shelves mean smaller individual storage spaces. Fewer shelves mean larger, open areas. Consider what you will store. Large art books need height. Small trinkets need shallow space.
Write down your cuts list. Calculate board footage to buy the right amount of wood. Buy a little extra for mistakes.
Step 2: Cut the Sides and Shelves
Lay out your boards. Mark your cut lines clearly. Use a square to ensure lines are perpendicular. This ensures the bookcase will sit flat and not wobble.
Cut the side panels first. These are the tall pieces that define the structure. If you are using a pocket hole jig, drill your joinery holes now. This is easier to do before assembly.
Cut the shelves next. Cut the bottom shelf slightly narrower than the side panels if you
Tools and Materials Checklist
You don’t need a professional shop to tackle this project. The list is short. Gather these items before you cut anything.
Tools:
– Measuring rule
– Pencil
– Square
– Straightedge
– Power saw
– Hammer
– Miter box
– Handsaw
– Nail set
Materials:
– 3/4-inch grade A-B interior plywood
– Carpenter’s glue
– 6-penny finishing nails
– 1/8-inch tempered hardboard
– 5/8-inch brads
– 1-inch brads
– Shelf-edge molding
– Wood filler
– Sandpaper
– Stain or paint
Cutting the Frame
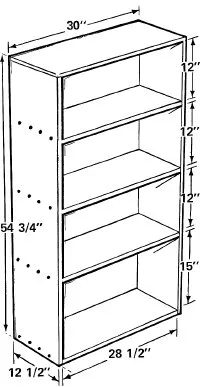
Start with the main structure. You need two side panels, a top, and a bottom. Cut two 12×54-inch pieces of 3/4-inch plywood for the sides. Cut one 12×30-inch piece for the top. Cut one 12×28 1/2-inch piece for the bottom.
Pay attention to the grain. Make sure the face grain of the plywood runs lengthwise on all pieces. This gives the bookcase a cleaner look if the edges are visible.
Assembling the Box
Lay the four cut pieces on edge on a flat surface. Arrange them into a rectangle. The bottom piece goes between the two side panels. The top piece sits on top of the sides.
Apply a bead of carpenter’s glue along all the butt joints. Align the joints carefully so the faces are flush. If the edges don’t match up, the finish will look rough later. Drive three 6-penny finishing nails into each joint to hold it while the glue sets.
Adding the Backing
Cut a 30×54 3/4-inch piece of 1/8-inch tempered hardboard for the back. Ensure the piece is perfectly square. A square back keeps the whole unit from racking.
Set the back on the bookcase frame. Adjust it until the frame is square and flush with all edges of the back piece. Apply a bead of glue all along the edge of the bookcase frame. Place the back piece into position with the smooth side facing the inside of the bookcase.
Secure the back with 5/8-inch brads. Space them about 12 inches apart and keep them 3/4-inch in from the edges. This adds rigidity and hides the raw edges of the plywood sides.
Marking the Shelves
Turn the bookcase onto its side. Measure off 15 inches along the side panel starting from the face of the bottom piece. Use a square and a pencil to make a light line across the side from front to back. This marks the front edge of the first shelf.
From that line, measure out 3/4-inch and draw another light line. This accounts for the thickness of the shelf material. Measure up another 12 inches and draw a line. Then measure up another 3/4-inch and draw another line.
Repeat this process for the next shelf. Measure up another 12 inches and 3/4-inch. Draw lines marking the top shelf position. Turn the bookcase over onto the other side. Repeat the process to mark the shelves on that side. These guidelines tell you exactly where the shelves will sit.
Installing the Shelves
Cut three 11 1/2×28 1/2-inch pieces of 3/4-inch plywood for the shelves. Ensure the face grain runs lengthwise.
Apply a bead of glue to each end and the back edge of each shelf. Slip each shelf into position. Align it carefully with the guidelines you drew earlier.
Nail it in place. Drive four 6-penny finishing nails through the bookcase sides from the outside. Aim the nails into the shelf ends at each joint. This locks the shelf in place securely.
Securing the Back Panel
Lay the bookcase face down. Measure up from the bottom at each side a distance of 16 1/8 inches. Make a mark at each point.
Line the marks up with a straightedge. Draw a pencil line between them. Similarly, measure up 12 inches from that line and draw another line. Then measure up another 12 inches and make another line.
Nail the back piece to the rear shelf edges along these guidelines. Use 1-inch brads spaced every 6 inches. This ties the back panel to the shelves, preventing wobble.
Applying Edge Molding
Lay the bookcase face up. Cut two 54 3/4-inch lengths of shelf-edge molding. Miter each end to a 45-degree angle.
Apply a bead of glue to the edges of the sides. Set the moldings in place. Align them carefully so they cover the raw plywood edges. Secure the molding with 1-inch brads spaced every 10 to 12 inches.
Cut two 30-inch lengths of molding. Miter each end to a 45-degree angle. Apply a bead of glue along the edges of the top and bottom pieces. Set the molding into place. Align the pieces carefully. Secure with 1-inch brads spaced every 10 to 12 inches.
Cut three 28 1/2-inch lengths of molding. Apply glue to the leading edges of the shelves. Set the molding in place. Secure the strips with 1-inch brads. The molding protects the edges from wear and gives the bookcase a finished appearance.
Finishing Touches
With a nail set and hammer, sink all of the nailheads. Do this for every nail except those on the back panel. The back nails are hidden anyway.
Sink the heads slightly below the surface of the wood. Fill the nailhead holes with wood filler. Let it dry completely.
Sand the bookcase smooth. Start with a medium grit and move to a fine grit for a smooth finish. Finally, stain or paint as desired.
More DIY Projects
If you’re in the mood for more woodwork, consider these related tasks:
- How to Repair Wooden Furniture: You don’t have to start from scratch. Learn how to fix the wooden pieces you already have instead of tossing them.
- How to Stain Wooden Furniture: Staining adds protection and custom color. Doing it yourself means you get exactly the shade you want. Follow instructions for staining pieces you’ve purchased or made.
- A Guide to Decorating Wooden Furniture: Wood can fit any design scheme. Use guides to transform simple items into elegant, finished pieces that accent your home.
How to Build a Desk
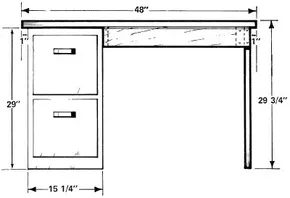
Paperwork doesn’t have to clutter your kitchen table. You can build a simple, functional desk that tucks into tight corners and hides your filing cabinet inside its frame. It takes just a few basic tools and about three to four hours to put together, not counting the paint drying time.
Required Tools and Materials
You don’t need a full workshop for this. Just gather these items before you start cutting.
Tools:
– Measuring rule
– Pencil
– Square
– Straightedge
– Power saw
– Hammer
– Miter box
– Handsaw
– Nail set
– Paintbrushes
Materials:
– 1 × 4 and 2 × 4 lumber
– Carpenter’s glue
– 6-penny finishing nails
– 3/4-inch grade A-B plywood
– 8-penny finishing nails
– Shelf-edge molding
– 3/4-inch brads
– Wood filler
– Sandpaper
– Primer
– Paint
– Standard two-drawer file cabinet (29″ H × 15 1/4″ W × 22″ D)
How to Build the End Frame
The design relies on a standard two-drawer file cabinet to support one end of the desk. If your cabinet is a different size, adjust the measurements below to fit. The final desk will be 48 inches long, 24 inches deep, and 29 3/4 inches tall. It works with any standard-height chair, including stenographer models.
Start with the frame. Cut two pieces of 1 × 4 to 30 3/4 inches long. You also need one piece of 1 × 4 cut to 20 1/2 inches and one piece of 2 × 4 cut to the same length.
Lay these pieces on edge on a flat surface to form a rectangle. The 2 × 4 acts as the side piece. Position it so the outer face sits 3/4 inch back from the ends of the front and back 1 × 4s. This creates the depth for your end panel later.
Apply carpenter’s glue to the joints. Align everything carefully. Nail them together using two 6-penny finishing nails at each joint. Don’t skip the glue. It makes the structure rigid.
Installing the End Panel
Next, cut a piece of 3/4-inch plywood to 20 1/2 inches by 29 inches. This becomes your end panel.
Place it against the outside face of the 2 × 4 side piece. It should sit between the front and back 1 × 4s. The top edge needs to be flush with the top of the desk frame.
Here is where you lock it in. Apply glue to the butt joints. Put a generous coat of glue on the face where the end panel meets the side piece.
Secure the panel with nails. Drive a pair of 8-penny finishing nails through the faces of the front and back frame pieces, directly into the edges of the plywood. Then, drive six 6-penny finishing nails through the face of the end panel into the 2 × 4 side piece. Stagger these nails. Space them out for better grip.
Once that end is solid, you’ll build the opposite side and connect them with a top panel. The file cabinet slides into that space, turning a hollow frame into a sturdy workstation.
Get the 24 x 48-inch piece of 3/4-inch plywood ready. Make sure the face grain runs lengthwise. This direction matters for stability and look.
Grab the desk frame. Spread wood glue along the top edge of the assembly. It’s the end panels and the frame. Position the plywood top. You need specific overhangs.
Rear gets a 3/4-inch overhang. Front needs 1 1/4 inches. The right side takes 1 inch. Don’t eyeball this. Measure it.
Now nail it down. Use 6-penny finishing nails. Drive them through the top into the frame edges and end panel. Start at the corners. Place nails about 2 inches from each corner in both directions. Space the rest 11 to 12 inches apart.
Hit the 2×4 side member with three more 8-penny finishing nails. Drive them down. This locks the side in place.
Time for edges. Cut strips of shelf-edge molding. You need them for the front and side edges of the top. Also cover the front edge of the end panel.
Fit each piece carefully. If you use square-edge molding, you can butt the joints. It’s simpler. But rounded-edge molding looks better. Miter those corners at 45 degrees. Perfect right angles require precision here.
Apply glue to the molding. Set the strips. Secure them with 3/4-inch brads. Don’t rush. One loose strip ruins the look.
Use a hammer and nail set. Sink all nailheads below the surface. They’ll show if you leave them proud.
Fill the holes. Use wood filler for nailheads and any wood imperfections or joint gaps. Sand the whole desk. Get it smooth.
Prime it. Then apply two coats of semigloss interior latex paint. Let it dry completely. No shortcuts.
Slide the desk over a two-drawer file cabinet.
Ta-da. Organization starts now.
Need more space? Check the next section for building a telephone stand.
For more ideas related to creating your own furniture, see:
-
How to Repair Wooden Furniture : You don’t have to start from scratch. Learn to fix wooden pieces you already own.
-
How to Stain Wooden Furniture : Staining adds protection and color. DIY lets you pick the exact shade. Follow the instructions for painted or handmade pieces.
-
A Guide to Decorating Wooden Furniture : Transform simple items into elegant accents. Match any design scheme or color palette.
How to Build a Telephone Stand
Assembling the Core Cabinet
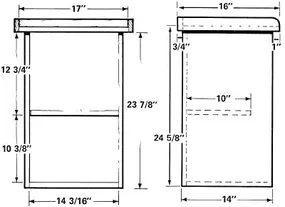
You need to cut six main pieces from 3/4-inch grade A-B plywood. Get the grain direction right. Run it parallel to the long dimension of every board. The cuts are specific.
- Bottom: 14 × 14 3/16 inches
- Sides: Two pieces at 14 × 23 7/8 inches
- Top: 15 × 17 inches
- Back: 14 3/16 × 23 1/8 inches
Lay the back piece flat. Put a bead of carpenters’ glue along one long edge. Stand the bottom piece up against it. Keep the corners flush. Use four 6-penny finishing nails to lock them together.
Flip the assembly onto its side. Add glue to the top edge of the back. Slide in one side piece. Align the top corners. The bottom of the side must sit flush with the bottom of the base. The outer edge of the side lines up with the outside of the back. Nail it down. Three 6-penny finishing nails go through the edge of the bottom piece. Drive five more nails into the back edge.
Turn the whole thing over. Repeat the process for the other side.
Adding the Top and Shelf
Stand the box upright. Glue the top edges of the back and sides. Set the top piece in place. The rear edge sits flush with the back panel. Leave a 1-inch lip at the front. Center it so you have about a 3/4-inch lip on each side.
Secure the top. Three 6-penny finishing nails along each side. Four more across the back. Space the side nailing line 1 3/32 inch in from the edge.
Now for the shelf. Cut a piece to 10 × 14 3/16 inches. Test the fit between the sides. It should be snug. Use a square, measuring rule, and pencil to mark a line on the inside face of each side piece. Measure 10 3/8 inches up from the inner face of the bottom piece.
Glue the back and side edges of the shelf. Slide it into place on your guidelines.
Draw light pencil lines on the sides and back to mark where the shelf ends. Nail it down. Three 6-penny finishing nails through the sides into each end of the shelf. Four more nails through the back into the shelf edge.
Installing the Louvered Doors
You’ll need two 7 × 23-inch stock louvered doors. These give the cabinet some air flow and style. But first, you need to cut openings in the side panels.
Wait. The previous instructions didn’t explicitly detail cutting door openings, but you can’t install hinges and doors without them. Assuming the design calls for doors on the front (which is standard for this type of cabinet to hide clutter), you likely need to cut rectangular openings in the front face of the side panels or, more commonly, install the doors on a front frame.
Correction/Clarification based on standard DIY cabinet construction: The instructions provided in Part 1 (implied) or the materials list suggest a front-opening cabinet. However, the assembly instructions only built the box with a back, two sides, a bottom, a top, and a shelf. There is no “front panel” mentioned in the cut list. This implies the doors might be mounted directly to the sides, or there is a missing front frame component.
Let’s look at the materials again.
* Two cabinet knobs
* Four decorative surface-mount hinges
* Two cabinet door roller-catch assemblies
Roller catches suggest the doors slide or hang on a track, or they are simple latching mechanisms. Surface-mount hinges usually imply a face-frame or edge mounting.
If there is no front panel, the doors must be mounted to the inside or outside of the side panels, or there is a missing front frame piece that should have been cut. Given the dimensions (23 7/8 inch height), and two doors, each door is roughly 11-12 inches wide if they meet in the middle.
Assumption for continuity: Since the prompt asks to continue the build and the materials list includes doors and hinges, but the assembly stopped at the shelf, the next logical step is preparing the front for the doors. If this is a “telephone stand,” the phone sits on the top or in an upper compartment. The doors likely cover the lower storage.
Let’s assume the cabinet has a front opening. You need to install the hinges.
Attaching Hinges and Handles
Take two decorative surface-mount hinges. Place them on the front edges of the side panels. Wait, you can’t mount a hinge on the edge of a 3/4-inch side and expect a door to swing unless the door is thick or there’s a frame.
Alternative interpretation: Perhaps the “doors” are actually sliding doors on a track? No, it says “roller-catch assemblies.” And “hinges.”
Let’s stick to the most common DIY error in these old articles: missing the front frame. Or, perhaps the doors are mounted to the inside of the cabinet, like a bifold? No, “surface-mount” usually means external.
Flip the cabinet body upside down. It’s easier to work on the edges this way. You need shelf-edge molding to cover the plywood seams. Cut strips to fit the top, bottom, and sides. You can use butt joints or mitered corners, depending on your skill level.
Apply wood glue to the plywood edges. Press the molding strips into place. Secure them with 1-inch brads. Space the nails about 6 inches apart. This keeps the trim tight without splitting the thin wood.
Rounding the Corner Edges
Now for the decorative front. Cut two pieces of 1×2 pine stock. Each should be 15 3/4 inches long. Add the thickness of your edging, usually 3/8 inch, to that measurement.
Take a file or sanding block and round the top end of each strip. Aim for a 3/4-inch radius. It doesn’t have to be perfect, just smooth and identical on both pieces. This curve will become the front corner of the stand.
Attaching the Corner Trim
Apply a bead of glue along the side edges of the top plywood panel. Position one of your rounded pine strips. The rounded end faces forward. Align the bottom edge with the bottom of the top panel.
Fasten it with three 6-penny finishing nails. Drive them into the side edge of the cabinet. Do the same for the other side.
Next, you need a back connector. Cut a piece of 1×2 pine stock to 17 inches long. Glue this strip to the rear edge of the top panel. Align the top edges with the side strips.
Secure it with four evenly spaced 6-penny nails. Then, drive two more nails through the ends of the side strips into the back strip. This ties the front and back together, creating a solid frame for the doors.
Hinging and Knobs
Install the hardware before the doors go on. It’s much harder to reach once they’re hung. Mount a cabinet knob on each door. Place them on the vertical centerline, about 6 inches down from the top.
Hang the hinges on opposite sides. The top hinge should start 4 inches down from the top of the door. The bottom hinge sits 4 inches up from the bottom.
Set the doors in place. You want a 1/16-inch gap around the top, bottom, and sides. This clearance prevents binding. Secure the hinges to the cabinet frame. Drive the screws straight through the hinge holes. Center each screw for best alignment.
Latching and Prep
Mount roller catches to latch the doors. Follow the manufacturer’s instructions for these specific pieces. Place one catch on the inside of each side of the top panel. Center them on the longitudinal centerline of the door frame. They need to line up with the knobs when closed.
Remove the doors. Take off all the hardware. You don’t want dents in your finish.
Use a hammer and nail set to sink every visible nailhead below the surface. Fill the holes and any joint gaps with wood putty. Let it dry.
Sand the entire cabinet and both doors until they are smooth to the touch. Wipe away the dust.
Finishing the Paint Job
Prime the wood. One coat is enough to seal the surface.
Apply two coats of interior semigloss latex paint. Semigloss is practical here. It’s easier to clean than flat paint, which matters for a piece near the floor.
Let the final coat dry completely.
Place your phone on top. Store cords, extra lines, or notepads inside the cabinet. It keeps the clutter off the desk and gives the room a tailored look.
If you want to keep the momentum going, check out the next project. It’s a plant stand that complements this design.
For more ideas related to creating your own furniture, see:
-
How to Repair Wooden Furniture: You don’t have to start from scratch and make new furniture. Learn how to repair the wooden pieces you already have.
-
How to Stain Wooden Furniture: Staining wooden furniture adds protection as well as beautiful color, and when you do it yourself, you can get just the shade you want. Follow this link for instructions on staining pieces you’ve purchased or handmade.
-
A Guide to Decorating Wooden Furniture: Wooden furniture can be decorated to fit any design scheme or color palette. Use this guide to transform simple items into elegant, finished pieces that will accent your home.
How to Build a Plant Stand
Your houseplants deserve better than to sit awkwardly on the floor or get lost on a crowded shelf. They want attention. Give them a dedicated spot by building a simple wooden stand. It works on a table or floor, and you can tweak the size for bigger pots. You’ll spend about three hours on this, plus drying time for glue and finish.
Gather Your Tools and Materials
You don’t need a fancy workshop for this. Just clear space and these items:
Tools
– Measuring rule
– Pencil
– Carpenter’s square
– Handsaw or saber saw
– Drill with 3/4-inch, 9/64-inch (#28), and 1/16-inch (#52) bits
– Straightedge
– Chisel
– Hammer
– Fine-toothed flat file
– Miter box and backsaw
– Nail set
– Sanding block
– Countersink
– Screwdriver
– Paintbrush
Materials
– 3/4-inch grade A-A plywood (furniture grade)
– Half-round molding
– Hide glue
– 3-penny finishing nails
– Medium- and fine-grit sandpaper
– Rag
– 2-inch #6 flathead wood screws
– Plastic wood
– Paint or stain
Build the Base with the Slot
Start with the bottom. Cut two pieces of plywood, each 12 inches wide and 24 inches long. Keep the grain running along the length. Use a carpenter’s square to ensure your corners are true before cutting with a handsaw or saber saw.
Next, find the center. Draw horizontal and vertical centerlines on each piece. On the vertical line, mark a point 3/8-inch below the horizontal center. This is where the pot’s drainage hole will sit. Drill a 3/4-inch hole here.
To prevent splintering, drill from one side until the bit just pokes through. Then flip the board and finish the hole from the other side.
Cut the Access Slot
With a straightedge, draw lines from the sides of the hole down to the bottom edge of the base. This outlines a slot 3/4-inch wide. Cut these slots using a handsaw or saber saw. Stay on the inside of your lines to keep the width even.
Now, square up the rounded tops. You can use a saber saw or a chisel and hammer. If you choose the chisel, go slow. Make many small cuts. One big swing can tear the wood fibers. File the raw edges with a fine-toothed flat file.
Test the fit as you go. Use a scrap piece of 3/4-inch plywood. File only until the scrap slides in. The slot walls must be flat and square. No rounded edges. No splinters.
Construct the Top and Trim
The top is a 14-inch square. Measure and mark it carefully with a carpenter’s square. Cut four pieces of half-round molding, each 14 inches long. Miter the ends at 45 degrees so they meet at perfect corners.
Apply hide glue to the back of each strip. Nail them to the plywood top using 3-penny finishing nails. Use a nail set to sink the heads below the surface. Let the glue dry fully according to the manufacturer’s instructions.
Finish the Base Edges
Take the four 24-inch pieces of half-round molding for the base. Cut the ends square. Glue and nail these to the long, outside edges of your base pieces. Sink the nailheads.
Wait for the glue to cure.
Sand and Prepare for Finish
Once the glue is dry, it’s time to smooth things out. Use a sanding block with medium- and fine-grit sandpaper. Sand the base pieces and the top. Pay attention to where the molding meets the plywood edge.
Do not sand the inside of the slots in the base. Leave those rough areas alone. You’ll want to keep them as they are for structural integrity and fit.
After sanding, wipe down the wood with a rag. Fill any nail holes with plastic wood. Once that dries, sand it smooth. Prime, paint, or stain the stand to protect the wood and match your decor.
This build is straightforward but precise. The slot needs to be accurate for the pot to sit right. Take your time with the chisel work. It’s the part that separates a pro-looking piece from a DIY fumble.
Now you have a spot for your green friend. It’s elevated. It’s visible. What’s next? Maybe a new pot. Or maybe just letting the plant enjoy its new throne.
Locking the Base
Start with hide glue. Slather it on the inside edges of the slots in your base pieces. Press them together at a right angle. The glued slots need to interlock firmly. Make sure the top and bottom edges are flush. It’s easy to miss a millimeter here, but it matters.
Set the base on a flat surface. Check the alignment. Adjust until the pieces are perfectly in line and square. Then wipe away leaked glue before it cures. Let it dry completely. Follow the manufacturer’s timing. Do not rush this.
Marking the Top
When that glue is hard, move to the top piece. Draw a heavy X on the bottom side. Corner to corner. Keep it precise. Then draw a light X on the top side. This is your guide.
Place the top on the assembled base. Align it so the dark X on the bottom is hidden by the edges of the base’s own X. You are masking your work marks. Good.
Now, mark for screws. Along each arm of the light X on the top, mark two points. You need eight screws total. Two per arm. Remove the top piece from the base.
Drilling the Holes
Use a 9/64-inch bit. Or a #28. Drill completely through the top at each marked point. Countersink these holes. You want the screw head to sit slightly below the wood surface. Otherwise, it will snag or look ugly.
Put the top back on the base. Align it. Mark the screw holes on the edges of the base X. These are your entry points for the base.
Switch to a 1/16-inch bit. Or a #52. Drill pilot holes 1 inch deep at those marked points. Go slow. You don’t want to blow out the wood fibers.
Securing the Stand
Apply hide glue to the edges of the base X. Set the top into place. It should fit snugly.
Drive 2-inch #6 flathead wood screws through the top holes and into the pilot holes in the base. Do it quickly. Hide glue sets fast.
Turn the stand over immediately. Wipe off excess glue. If you wait, you’ll be scraping dried glue out of your wood grain later.
Sanding and Finishing
Use plastic wood. Fill any screw holes. Fill nail holes if you used nails earlier. Fill cracks at the edges of the half-round molding. Smooth it out.
Lightly sand the top of the stand. Remove the penciled X. Sand all visible wood surfaces as necessary. You want a uniform texture before paint or stain.
Apply your finish. Paint or stain as desired. Let it cure.
Enjoy Your Creation
When the plant stand is dry, move your favorite flower or fern onto its new home. It’s sturdy. It’s square. It’s yours.
For more ideas related to creating your own furniture, see:
-
How to Repair Wooden Furniture : You don’t have to start from scratch. Learn how to repair the wooden pieces you already have.
-
How to Stain Wooden Furniture : Staining adds protection and color. Do it yourself to get the exact shade you want.
-
A Guide to Decorating Wooden Furniture : Transform simple items into elegant pieces that fit any design scheme.