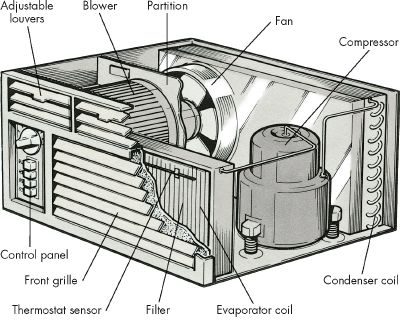
Room air conditioners operate on the same fundamental principles as their central air counterparts. The difference is scale. A window unit is compact, portable, and often significantly more expensive to run per square foot. Depending on its BTU rating and placement, a single unit can chill just the bedroom it sits in, or if positioned strategically, it might bleed into the adjacent hallway or living space.
But there is a catch.
The efficiency of that cooling power relies on a delicate arrangement of components sandwiched between the coils. You have the compressor pushing refrigerant, two fans circulating air, a motor driving the system, and a thermostat governing the temperature. When this machinery works, you feel cool air. When it fails, you feel a draft. And usually, you feel warm.
Dirt is the primary culprit.
It doesn’t take much to degrade performance. Dust settles on the evaporator coil, insulating it so it can’t absorb heat effectively. It clogs the air filter, starving the fan of the airflow it needs. It blocks the drain port, leading to leaks. And it gums up the fan blades themselves, forcing the motor to work harder for less output.
The Dirt Problem
Most homeowners ignore the maintenance until the unit stops blowing cold air. By then, the damage is often done. The coils are coated. The filter is a solid sheet of grime. The fan is struggling against resistance.
Cleaning a window AC isn’t complicated. It doesn’t require special tools or a service call. But it does require willingness. You need to pull the unit from the window. You need to access the filters and coils. You need to scrub them down.
Neglecting this step raises your electric bill. It shortens the life of the compressor. It makes the room warmer than the thermostat setting suggests. Why pay for cooling that isn’t happening?
Start with the filter. Remove it. Wash it with warm soapy water. Let it dry completely before putting it back. If it’s torn, replace it. Next, tackle the coils. Use a soft brush or a vacuum attachment. Don’t bend the fins. They are thin. They tear easily.
Then, check the drain port. If water is pooling inside, clear the blockage. A simple flush with a mixture of water and vinegar can help dissolve mineral deposits.
It’s not glamorous work. It’s dusty. It’s tedious. But it’s the difference between a unit that cools efficiently and one that just hums along, wasting power.
The next part covers how to inspect the fans and motor for wear. Because if the air isn’t moving, the cold isn’t either.
The Safety Rule You Can’t Skip
Before you even think about grabbing a screwdriver, look at the wall. Is the plug out?
This isn’t just a suggestion. It’s a life-safety requirement. Room air conditioners contain capacitors. These components store electrical charge even after the power is cut. If you touch a live capacitor, you get a severe, potentially fatal shock. The manual tells you where they are. It tells you how to discharge them safely. If you don’t know how to do that, or if you’re unsure, step back. Call a pro.
What You Can Fix vs. What You Must Call In
Here is the hard truth about window units: they are sealed systems. The compressor, the motor, and the coils are locked inside one housing. You cannot open them up and tinker. If those parts fail, it’s time for a professional or a replacement unit.
But that doesn’t mean you’re helpless. You can maintain them. You can fix minor issues. And if the big stuff breaks, you can save money on service calls by removing the unit yourself and taking it to a shop.
During winter, keep the outside portion covered. Use a commercial cover or heavy plastic sheeting held down with duct tape. Or pull the unit out and store it.
Diagnosing the Problem
When the heat hits and the air stops blowing cold, don’t wait. Use this guide to pinpoint the issue. Most problems are simple.
Unit won’t turn on
* No power: Check the cord. Check the plug. Check the outlet. Look at your main breaker panel. Did a fuse blow? Is the breaker tripped? Reset it.
* Safety shutoff: The motor may have overheated. Wait 30 minutes. Press the reset button. If it trips again, the problem is deeper.
* Faulty switch: Look at the terminals. Is there burning? If yes, replace the switch. If it looks clean but still doesn’t work, call a technician.
Fuses keep blowing
* Overloaded circuit: Plug the unit into a different outlet on a separate circuit.
* Low voltage: If the power from the grid is weak, you need to call the power company or a professional electrician.
Cooling is weak or non-existent
* Thermostat setting: It might be set too high. Lower it by five degrees.
* Dirty filter: This is the most common culprit. Clean it. Or replace it if it’s disposable.
* Dirty coils: Dust blocks heat exchange. Clean the coils.
* Blocked condenser: Make sure nothing is blocking the outside of the unit. Leaves, debris, or furniture can stop airflow.
* Mechanical failure: If the motor, compressor, or coolant line is faulty, you cannot fix this yourself. Call a pro.
Fan runs, but no cold air
* Thermostat issue: The sensor might be dead. Test it. If it’s bad, replace it or call a pro.
* Dirty coils: Again, clean them.
* Motor or compressor failure: These are sealed components. Professional repair is the only option.
Fan doesn’t run, but unit cools
* Switch setting: Reset the control switch. Try different settings.
* Clogged or bent blades: Clean the fan blades. Tighten them. If they are bent, straighten them carefully.
* Motor failure: Replace the fan motor or call a professional.
Unit cycles on and off repeatedly
* Dirty filters and coils: This causes overheating and short-cycling. Clean both.
Maintenance Is the Real Fix
Most of the time, your unit isn’t broken. It’s just dirty. A clogged filter and grime-covered coils starve the system of airflow and heat transfer. You can clean these yourself. It takes an hour. It costs nothing. It extends the life of the unit.
For the sealed components—the heart and lungs of the machine—leave it to the experts. But for the filter, the coils, the fan blades, and the switch? That’s on you. Start there.
Cleaning the Filter for Better Airflow
You cannot overstate the importance of the air filter. It is the first line of defense for your indoor air quality and the health of the unit itself. If you skip this step, dust accumulates on the coils, forcing the compressor to work harder, which spikes your electric bill and shortens the lifespan of the machine.
Check the filter at the start of every cooling season. During the summer, pull it out once a month. If you live in a dusty neighborhood, near construction, or have pets, increase that frequency. Some weeks, you might need to clean it twice.
Most window units use a washable filter that feels like sponge rubber. You can rinse it with mild detergent and water. Swish it around. Rinse until the water runs clear. Let it dry completely. Do not reinstall a damp filter; it will breed mold and smell bad.
Some older or specific models use disposable filters, similar to those in furnace systems. These cannot be washed. When they look gray or clogged, toss them and buy a replacement of the exact same size and rating. Using the wrong size leaves gaps where air bypasses the filter entirely.
Checking the Power Cord for Safety
A frayed power cord is a fire hazard. It can also cause intermittent power loss that makes the unit act up randomly. Before you assume the motor is dead, check the cord.
Unplug the unit. Remove the control panel to access the wiring terminals. You need to verify continuity. Attach a test wire across the bare lead wires inside the housing. Then, take a volt-ohm-milliammeter (VOM) set to the RX1 scale. Clip the leads to the prongs of the plug.
If the meter reads zero, the circuit is complete. The cord is good. If it reads any number higher than zero, there is resistance in the path. The cord is failing. Replace it immediately. Do not try to splice wires with tape and hope for the best. That is a temporary fix that leads to overheating. Use a replacement cord rated for the unit’s amperage.
Straightening Coils and Removing Debris
The evaporator and condenser coils are the heart of the heat exchange process. They need to breathe. Dust, leaves, and pollen clog the fins between the tubes. This insulation effect reduces cooling efficiency significantly.
Vacuum both coils at the start of the season and monthly thereafter. Use the brush attachment to get into the fins without bending them.
If the fins are bent, airflow is restricted. You can fix this with a fin comb. You can buy these at most appliance parts stores. They are inexpensive metal tools with teeth spaced to match the coil fins. Slide the comb into the gaps. Gently push the fins back into alignment. Be careful. The fins are thin-gauge aluminum. They bend like paper if you are clumsy. Straight fins mean better airflow. Better airflow means lower energy costs.
Replacing a Faulty Selector Switch
If the unit gets power but refuses to turn on, the selector switch is a prime suspect. This switch sits right behind the control panel. It routes electricity to the fan and compressor based on your settings.
If the unit is dead on all settings, remove the panel. Locate the switch. Inspect the terminals. Look for burnt insulation. Look for black burn marks. Heat degrades plastic and melts contacts over time.
If you see damage, the switch is gone. Replace it with an identical model. Match the voltage and amperage ratings exactly. Unscrew the old one from the frame or panel. Wire the new one in the same configuration. Secure it with screws.
If the unit still does not run after replacing the switch, stop. The problem may be deeper. Call a professional. DIYing beyond your skill level with high-voltage components is dangerous and can void warranties.
Unclogging Drain Ports to Stop Leaks
Condensation is natural. As the evaporator coil cools the air, moisture pulls out of the humidity. This water needs a place to go. It flows to drain ports or an opening between the evaporator and condenser coils. The fan blows this moisture against the condenser coil, where it evaporates into the outside air.
When those ports get clogged with dirt or algae, the water has nowhere to go. It backs up. It leaks out of the bottom of the unit, usually through the grille. This ruins your window sill. It can damage your floor. It can grow mold on your walls.
Prevent this by cleaning the ports every month during the season. Grab a short piece of stiff wire, like a bent wire hanger, or the blade of a pocketknife. Gently poke inside the port to dislodge debris. Clear the blockage.
Check the condenser side as well. Some models have a secondary drain port along the bottom edge of the cabinet frame. Clean that one too. If water is leaking, you likely missed a clog. Clear it until the water flows freely.
When to Call a Pro: Motor and Compressor
The motor and compressor are the heavy lifters. They handle high voltages and high pressures. If these fail, DIY repair is rarely the answer.
If the motor hums but does not start, or if the compressor makes a loud clicking noise, you likely have a mechanical failure. Capacitors might be bad, but replacing them requires specific knowledge and safety precautions. If the compressor seizes, the entire unit may need replacement.
Before you call a technician, check the thermostat. Sometimes the issue is not the machine but the signal it receives. A faulty thermostat can make a perfectly good AC unit look dead. Learn how to test and replace a thermostat first. It is the cheapest and easiest diagnostic step you can take.
If the thermostat is fine and the motor or compressor is suspect, hand it over to a professional. They have the gauges, the tools, and the training to handle refrigerant and high-voltage components safely. Trying to fix a compressor yourself can result in injury or further damage to the unit.
If you want to expand your skills, look into repairing central air systems if you have one. Or tackle small appliance repair, like toasters or blenders, to build confidence. Understanding how these machines work makes you a better homeowner.
Testing and Replacing the Window AC Thermostat
The thermostat isn’t just a dial you turn; it’s the brain of your window unit. If it fails, the whole system goes silent. You don’t need a degree in engineering to fix it. Just a screwdriver, a multimeter, and a replacement part that matches the old one exactly.
First, you need access. Remove the front grille and the control panel. Behind that plastic shell sits the thermostat. Pay attention to the sensing bulb. It’s a small tube attached to the thermostat that runs into the evaporator coil. It feels the air temperature. If that bulb is misaligned, your AC won’t know when to shut off.
When you pull the old thermostat out, mark where the bulb goes. Use tape. Write “top” on it. Do this before you disconnect anything. You’ll need to put it back in the exact same spot.
Now, grab your volt-ohmmeter (VOM) or multimeter. Set it to the RX1 scale. This is the resistance setting. Clip the tester probes onto the thermostat terminals. Turn the temperature dial to the coldest setting. Look at the meter.
If the needle reads zero, the circuit is closed. The thermostat is working. Good.
If the reading is higher than zero, the contacts are worn or dirty. The thermostat is broken. You need to replace it.
Connect the new thermostat exactly like the old one. If it clips on, clip it. If it screws in, screw it in.
Warning: Some modern thermostats have more than two lead wires coming off them. If you see three or more wires (excluding the sensing bulb wire), stop. Do not attempt to test or replace it yourself. Call a professional. These units often involve low-voltage control boards that require specific expertise.
Cleaning and Repairing the Room AC Fan
A noisy fan usually means a dirty fan. A silent fan usually means a loose fan. Most fan issues are simple mechanical problems. You can fix them with basic tools and some elbow grease.
Here is what you need:
– Vacuum cleaner
– Soft cloth
– Screwdriver or Allen wrench
– Long-blade screwdriver (for specific vent styles)
– Wrench
– 20-weight nondetergent motor oil
– Multimeter
Start by opening the cabinet. Locate the fan assembly. It’s usually right in the middle of the unit.
Step 1: Clean it. Use the vacuum to suck up dust bunnies and debris. Wipe the blades with a soft cloth. Dirt adds weight and unbalances the motor. This causes vibration. Vibration loosens bolts. Loosened bolts break things.
Step 2: Check for looseness. The fan blade is attached to the motor shaft. Look for a setscrew at the hub of the blade. Is it tight? If not, tighten it with a screwdriver or an Allen wrench.
If your unit has a round vent fan, you might not be able to reach the setscrew easily. In that case, insert a long-blade screwdriver through the port in the fan housing to hold the blade steady while you tighten the screw.
The fan itself is mounted in its housing with bolts. These bolts vibrate loose over time. Tighten them with a wrench.
Step 3: Lubricate. If your fan motor has oil ports, add a few drops of 20-weight nondetergent motor oil. Do this at the start of every cooling season. Do not use standard multi-purpose oil. It gets gummy. It attracts more dust. It kills the motor.
When to Replace the Motor
If the fan spins freely but doesn’t move air, the motor might be dead. You can test it.
Set your multimeter to the RX1 scale again. Disconnect the power wires from the terminals. Clip the probes to the wires.
Read the resistance.
– If the meter reads between 3 and 30 ohms, the motor is good.
– If it reads zero, the windings are shorted.
– If it reads extremely high (infinity), the windings are open.
In either failure case, you need a new motor.
To replace the motor, remove the fan, disconnect the power wires, and unbolt the motor. Install the new one in reverse order.
One final caution: If you have to move the condenser coil to get the fan motor out, stop. Do not try this. The coil is delicate. Refrigerant lines are fragile. If you bend the coil, you ruin the unit. Call a pro.
You’ve cleaned the fan. You’ve checked the thermostat. You’ve oiled the bearings. Your window unit should be humming again. If it’s still making weird noises, or if the air isn’t cold, the problem might be deeper. Maybe the compressor. Maybe the refrigerant level. Those are conversations for another day.